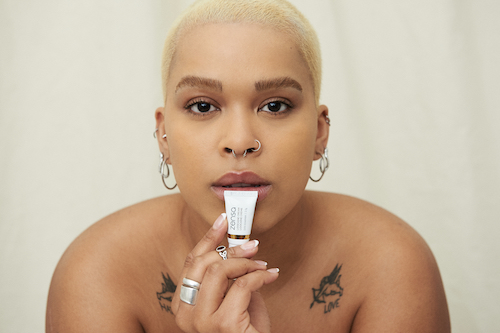
What To Expect Before & After Getting A Lip Blushing Tattoo
What To Expect Before & After Getting A Lip Blushing Tattoo
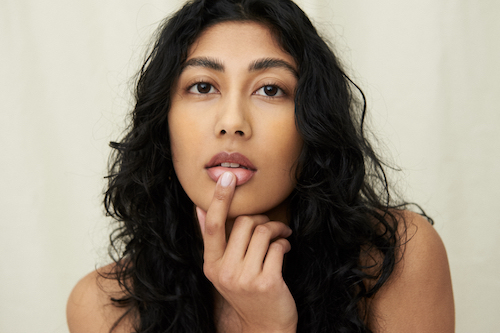
If you want a natural-looking lip shade that lasts through everything, it’s time to consider lip blushing. Lip blushing is a semi-permanent makeup treatment that involves injecting pigment into the top layer of the lips (epidermis) with a micro-sized mechanical needle. The pigment provides a subtle wash of colour – similar to a semi-permanent lip tint – for very natural results. It is far less opaque than regular lipsticks or permanent lip tattoos (popular in the ‘80s and ‘90s). Lip blushing is often used to colour-correct or enhance the shade or shape of your lips. The procedure can help with pigment loss and lip neutralization, or create the illusion of fuller, more defined and youthful lips. Unlike filler, lip blushing doesn’t add any material volume to the lips, which offers a more toned-down and all-around “your lips but better” look.
Lip blushing tattoos last around 2-3 years, depending on your lifestyle and habits, before needing a touch-up. Like with any semi-permanent procedure, it’s important to educate yourself as much as possible on the process and everything to know to achieve the best results.
Read on to learn more about what to expect at a lip blushing tattoo appointment, how to prepare, the best after-care tips for the healing process and more.
Explore Your Options
As with any long-term commitment, research and preparation are key. Do your research on the permanent makeup artists and studios in your area. Dive into their online portfolio and social media accounts to see if their work aligns with your desired results. Feel free to reach out to your vetted expert to learn more about their process before scheduling an appointment. Briefly speaking with an artist beforehand can help you uncover any red flags (such as an abnormally long average treatment time, a high pain level expectation or a lack of client engagement throughout the lip blushing process). This simple precaution can be the difference between a successful session and a lip blushing ‘gone wrong’ experience.
While the right professional will help you with the colour selection process, take time before your appointment to experiment with different shades. Try out various lipsticks, glosses, blushes and similar cosmetics to familiarize yourself with how different undertones and shades look on your natural lip colour and skin tone. Browse online and on social media (Instagram, Pinterest, TikTok) for more colour and lip shape inspiration.
Credit: First Class Cosmetics/Pinterest
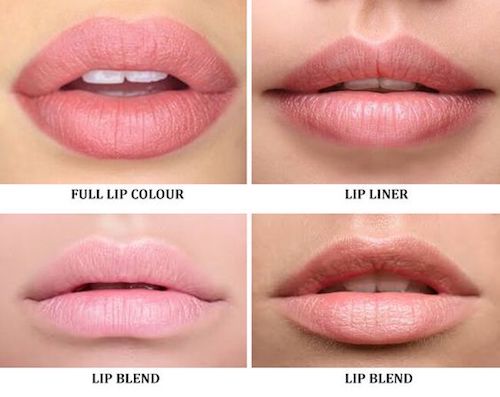
Know What You Want
After researching and trying out different options, figure out the lip colour and overall shape you want before your lip blushing appointment. Consider your natural colouring, including your skin tone and shade undertones, to determine which lip blushing colours will be most flattering on your bare lips. Individuals with pink undertones should stick with peach or peachy-pink shades, while individuals with yellow undertones should opt for brown-based neutral or blue-based reds and avoid purple-toned shades that can make your complexion appear too yellow. Coral tones are flattering for Asian and darker skin tones. Remember: You can always apply lipstick, liner, or gloss over your fully-healed tattoo for work, social events or special occasions.
Gather inspiration photos and shade names or compile a list of preferences (colour, shade undertones, lip shaping details, etc.) to bring with you to the studio. You can also bring your favourite lipstick, gloss or liner shades to your appointment for reference. The more information and visual examples you provide, the easier it will be for your artist to produce your desired results.
To help you select your ideal shade, read our simple 5-step guide on how to choose your perfect lip blushing tattoo colour.
Credit: Medicine of Cosmetics/Pinterest
Stay Hydrated
Having dry, cracked or chapped lips makes you ineligible for a lip blushing tattoo. Chapped, dry lips won’t properly absorb the pigment. So, it’s essential to keep your lips smooth and hydrated ahead of your appointment. Exfoliate and moisturize your lips every night for 5-7 days before a lip blushing session. Apply a sugar scrub or a similar natural exfoliator to your lips. Moisturize your lips immediately after exfoliating with a lip balm or a hydrating ointment like Aquaphor. Drink plenty of water to prevent the skin from becoming dehydrated.
Avoid alcohol and caffeine (regular coffee, decaf coffee, soda, certain teas) for 24-72 hours before lip blushing. These products can lead to dehydrated, thinner and more sensitive skin. Don’t workout within 24 hours before your appointment.
Take Inventory
Be mindful of your medical history, conditions and medications when considering a lip blushing treatment. Don’t take any blood-thinning medications, such as Ibuprofen, Aspirin, fish oil, or vitamin E, for at least a week before lip blushing. These substances may cause excessive bleeding when taken around the time of your lip blushing appointment. If you have any history of cold sores, go to your doctor to get an antiviral prescription before your procedure. Take this antiviral prescription daily for the 2 days before and after your lip blushing appointment. Once you’ve had a cold sore in the past, they can come back due to everyday triggers, like stress, and cause an infection – slowing down the healing process.
Someone who has an autoimmune condition, anemia, thyroid or Graves disease, diabetes (type 1 or 2), or is pregnant (or nursing) is not a candidate for lip blushing. Autoimmune conditions delay wound healing and the skin barrier repair process – leaving you at a higher risk for infection.
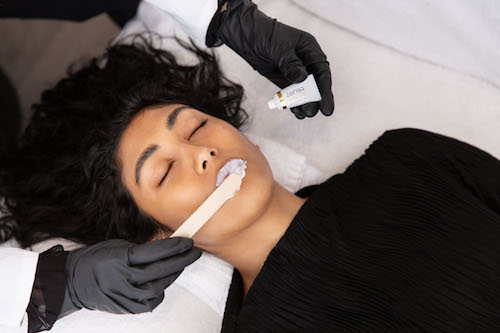
Prep For Less (or No) Pain
It is normal to be concerned that lip blushing will hurt (they’re needles involved, after all). However, the pain from lip blushing should be minimal – thanks to the numbing cream used before the procedure. Your permanent makeup artist will apply a numbing cream, like Zensa Numbing Cream, after you select your desired lip blushing colour and shape. The topical anaesthetic cream should be left on for around 20 minutes to allow the numbing effect to kick in before the procedure begins.

Zensa Numbing Cream contains 5% lidocaine (maximum strength) for nearly pain-free lip blushing. It has a natural PH formula designed to cater to sensitive areas, like the lips, and doesn’t contain any vasoconstrictors that prevent the ink from properly settling. The numbing effect should last between 2-3 hours after the initial application. Zensa Numbing Cream can also be reapplied later in the day on broken skin to minimize any pain after lip blushing.

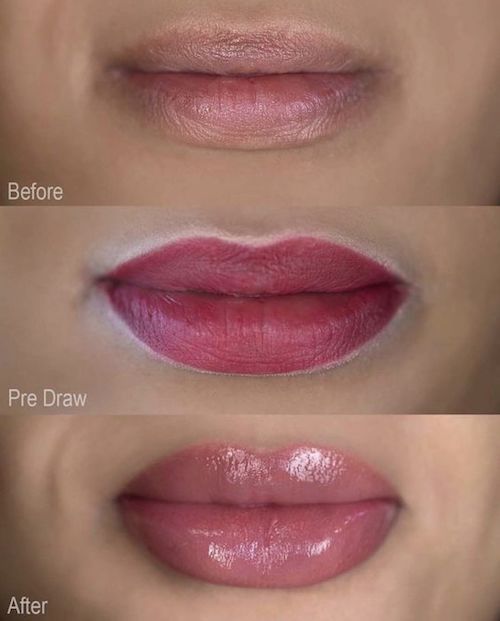
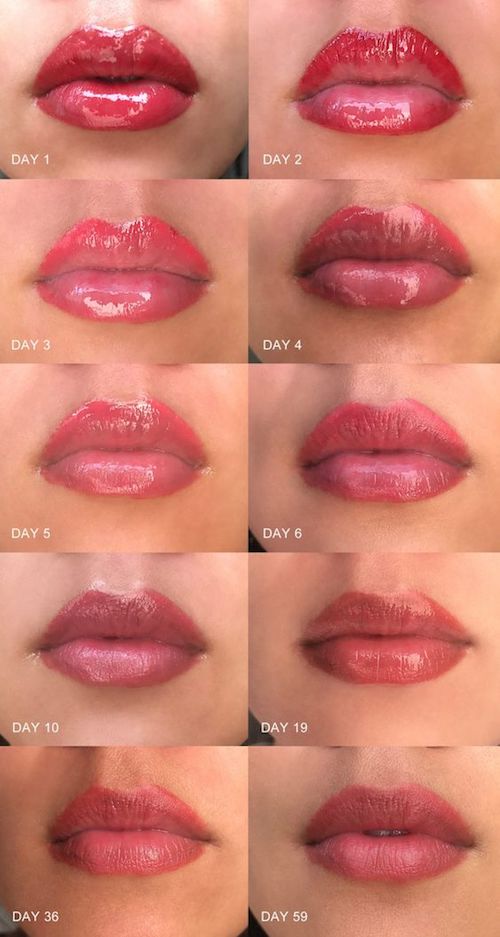
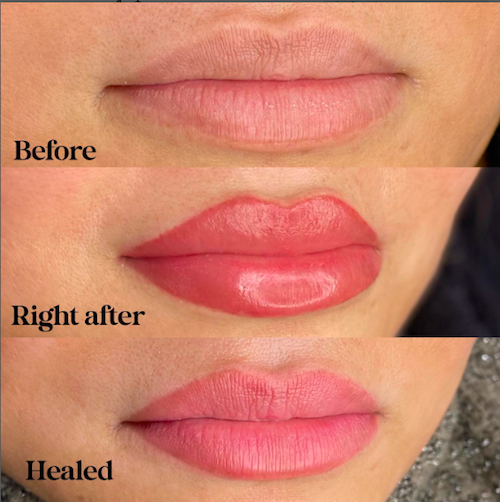
Bold Beginnings
Don’t be alarmed if the pigment appears bolder than expected immediately after lip blushing. The colour is around 30-50% more vibrant right after lip blushing when compared to the final results. This hyper-saturated look will fade while healing as the ink absorbs into the skin. Your lips also may initially appear fuller after lip blushing. For the first 24-48 hours, expect mild to moderate swelling. This swelling is the body’s way of calming its inflammatory response resulting from the micro-tears caused by the needle during lip tattooing. A patch test should’ve been done before the procedure to ensure that this swelling is not an allergic reaction to the ink.
Credit: The Baller On A Budget/Pinterest
Remain Clean, Cool and Consistent
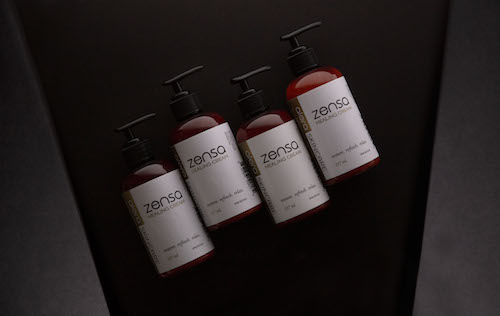
Proper after-care hygiene is essential during the lip blushing healing process. Use a clean wipe to remove any fluid from new ink 4-6 hours after lip blushing. Follow up this initial cleaning with an ointment (Aquaphor) or a tattoo lotion, like Zensa Healing Cream. For the next 7-10 days after your lip blushing appointment wash your lips with mild, antibacterial soap and lukewarm water after every meal (at least once a day). Blot off the excess water, and follow up with your moisturizing product.
Make sure to keep your lip blushing tattoo hydrated throughout the day. Always use a thin layer of ointment or tattoo lotion. Apply throughout the day as needed. Zensa Healing Cream contains moisturizing ingredients like shea butter and cucumber extract to keep the fresh lip blushing tattoo hydrated. It also includes sunflower seed oil to help preserve the pigment’s ink colour throughout the healing process.
Always wash your hands before cleaning or touching your lip blushing tattoo. Minimize touching your recovering lips as much as possible.
Avoid any forms of heat or moisture, from saunas and swimming to kissing, intense exercise and spicy foods after lip blushing. Make sure to avoid direct sun exposure during the lip blushing healing process. After the first 10 days of the healing process, always apply lip balm – with at least SPF 30 and UVA/UVB protection – before going into the sun to prevent ink fading.
Predict Peeling
Around 3-4 days after lip blushing, your lips will enter the peeling stage of the healing process. Like with a permanent tattoo, lip blushing triggers scab formation as the wounds heal from the procedure. As the scabs thicken, they start to flake off to unveil a fresh layer of healed skin.
Never pick at your scabs or peel off the flakes. Peeling off your scabs can result in pigment loss, patchiness or reopening of the wound – which can break the skin and potentially cause an infection. Allow the flakes to fall off naturally. Maintain your daily washing routine, and keep your lips well hydrated during this stage.
This peeling phase will last for up to a week. It can take the pigment up to 4 weeks to fully settle into your lips.
Credit: @drgerstmannyc/Instagram
Expect A Disappearing Act
Once the flaking and peeling subside, don’t be surprised if the pigment colour looks like it disappeared. Between days 7-21 of the lip blushing healing process, the skin thickens and temporarily conceals the ink. The pigment will “reemerge” as the skin heals and the colour settles over the next few weeks. This process takes between 4-6 weeks after your initial lip blushing procedure. After 8 weeks, you should schedule a follow-up appointment with your permanent makeup artist. For this follow-up session, your lips should be fully healed and can be touched up if needed.
FAQs:
How long does a lip blushing tattoo last?
Lip blushing tattoos last between 1-5 years, depending on the individual. Most people go 2-3 years between lip blushing treatments. Your body’s natural chemistry (the time it takes to absorb the pigment), lifestyle habits like smoking, swimming and sun exposure, or frequent exfoliating can also shorten the time in-between lip blushing sessions.
How much does lip blushing cost?
The average lip blushing procedure costs around $500 - $1,500. This cost should cover the initial lip blushing procedure and a follow-up session. The price of your treatment will depend on your location, artist’s experience and studio choice.
How long does the lip blushing procedure take?
The entire lip blushing appointment should take between 60-90 minutes from start to finish. This timeframe includes the initial consultation, applying the numbing cream and time for it to take effect, and the procedure itself. The follow-up appointment should take an hour or less.
How long does the lip blushing healing process take?
The complete lip blushing healing process takes 4-6 weeks. During the first 10 days, the lip blushing tattoo is the most vulnerable while the wound is still fresh. Remain diligent with your after-care routine during this period (washing, moisturizing, etc.), and avoid any habits or products (lipsticks or other cosmetics) that could infect the area. During the remaining weeks of the lip blushing healing process, always wear at least SPF 30 chapstick whenever your lips are exposed to the sunlight. To learn more, here’s a full guide to the lip blushing healing process.
Is lip blushing painful?
While any procedure involving needles sounds painful, permanent makeup artists apply a topical anaesthetic to ensure lip blushing hurts significantly less than you think. When using products like Zensa Numbing Cream, the lip blushing process should feel like tiny pricks grazing your skin. The painful level should be low to moderate, depending on your individual pain tolerance.
