How To Choose The Best Microblading Eyebrow Colour For You
How To Choose The Best Microblading Eyebrow Colour For You
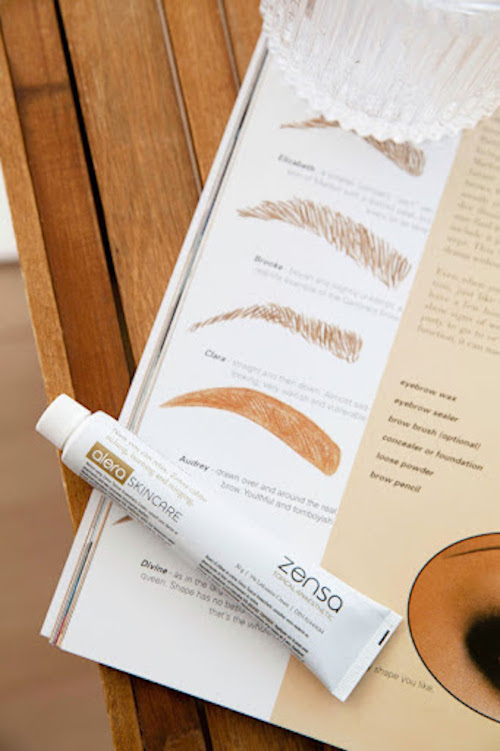
The phrase: “Pick a colour” carries more weight when you’re dealing with semi-permanent ink. Microblading treatments can last anywhere from 18-30 months, so it’s important to carefully consider how you want to shade and shape your brows (along with following the proper preparation and after-care instructions, of course). Once your permanent makeup artist completes the eyebrow mapping process to help you determine and confirm your desired microblading brow shape, it’s time to select your perfect pigment shade. Every artist mixes different pigments to customize each client’s eyebrow colour for microblading. However, it is helpful to understand the process beforehand, so you can experiment with different eyebrow pencils or cosmetics ahead of time and have a more informed conversation with your expert to ensure you leave your microblading session with your ideal results.
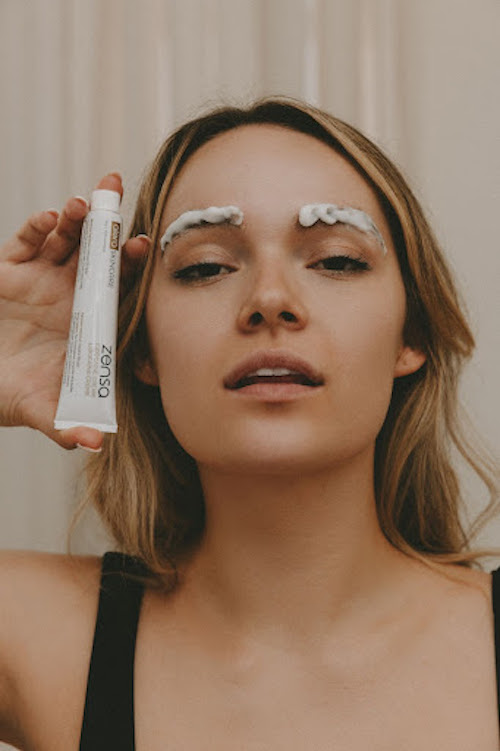
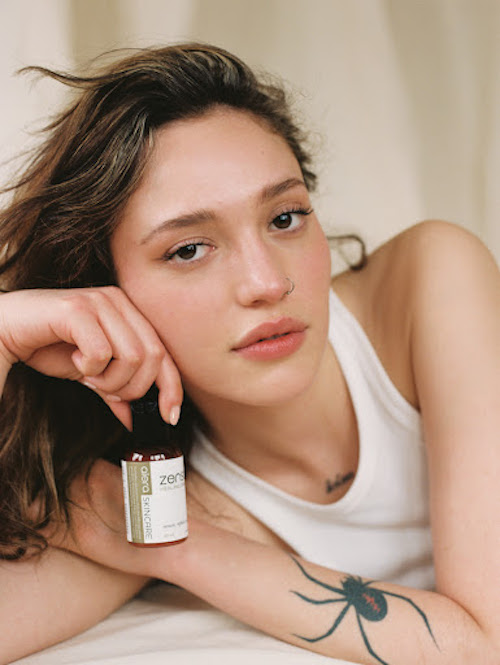
Expert Tip: Zensa Numbing Cream contains 5% lidocaine for maximum-strength pain prevention without compromising pigment retention. Our unique formula does not contain any vasoconstrictors, so using Zensa Numbing Cream before microblading will not temporarily change the client’s skin texture or negatively affect ink settling (the main reason any experienced PMU artist would be hesitant to use a topical anaesthetic). For some clients, using Zensa Numbing Cream (when applied correctly) makes the microblading process virtually pain-free.
Read on to learn more about discovering and shade-matching your perfect microblading brow colour with an overview of colour theory and must-know quick facts about microblading (cost, after-care instructions and the healing process).
What Is Microblading?
Microblading is a cosmetic tattooing (also called semi-permanent makeup) treatment that involves making tiny cuts along the brows to insert pigment into the skin, mimicking the appearance of natural eyebrow hair strokes. These incisions leave small wounds on the brows that will take around 30-45 days to heal. Most microblading treatments consist of an initial appointment and follow-up session approximately 6-8 weeks later. Your microblading treatment should last around 18-30 months when they are well maintained. Factors including your skin type, age and general lifestyle habits will determine the length of your healing journey and how long the results will last.
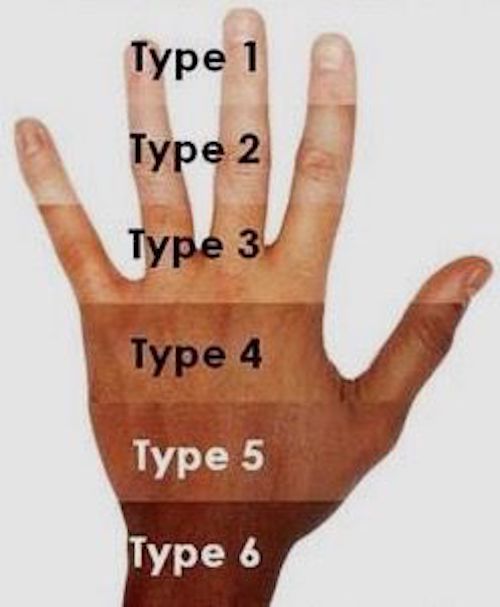
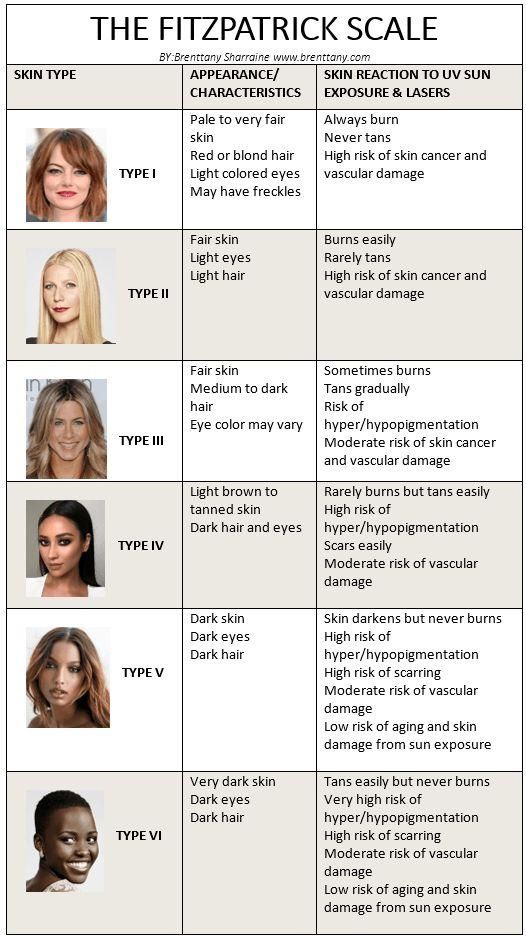
Study The Fitzpatrick Scale
The Fitzpatrick Scale is a universally-recognized criteria for permanent makeup artists to evaluate a client’s skin tone and type. It considers how your complexion appears in the mirror along with factors like one’s genetics, reactions to sun exposure and tanning susceptibilities. Created by Harvard dermatologist, Thomas Fitzpatrick in 1975, The Fitzpatrick Scale includes 6 skin types:
Very Fair (Skin Type 1):
- Appearance: Red/Blonde Hair, Blue/Grey/Green Eyes, Very Pale White Skin, Freckles
- Reaction To Sun Exposure: Always Burns, Never Tans
- Common Ethnic Background: Albino, English, Celtic
Fair (Skin Type 2):
- Appearance: Red/Blonde/Light Brown Hair, Blue/Grey/Green/Hazel Eyes, Light White Skin
- Reaction To Sun Exposure: Burns Easily, Rarely Tans (With Difficulty)
- Common Ethnic Background: Northern European
Medium (Skin Type 3):
- Appearance: Chestnut/Dark Blonde/Light Brown/Brown Hair, Blue/Grey/Green/Hazel/Brown Eyes, Medium White To Light Olive-Toned Skin
- Reaction To Sun Exposure: Sometimes Burns (Usually Mild), Sometimes Tans (Gradually)
- Common Ethnic Background: German/Central European
Credit: Laser & Cosmetics/Pinterest
Olive (Skin Type 4):
- Appearance: Light Brown/Brown/Dark Brown Hair, Hazel/Brown Eyes, Honey/Carmel/Olive Skin
- Reaction To Sun Exposure: Rarely Burns, Easily Tans
- Common Ethnic Background: Mediterranean, Southern European, Latin American, Middle Eastern, East Asian, Native American
Brown (Skin Type 5):
- Appearance: Dark Brown Hair, Deep Brown/Black Eyes, Brown Skin
- Reaction To Sun Exposure: Very Rarely Burns, Easily Tans
- Common Ethnic Background: Middle Eastern, Latin American, East Asian, South Asian, Indian, African
Deep Brown/Black (Skin Type 6):
- Appearance: Dark Brown Hair, Deep Brown/Black Eyes, Deep Brown/Black Skin
- Reaction To Sun Exposure: Never Burns, Very Easily Tans
- Common Ethnic Background: African, Australian Aboriginal, South Asian
Take The Fitzpatrick Test
The Fitzpatrick Test assesses different features based on genetic disposition (natural skin, hair, and eye colour) and reaction to sun exposure (likelihood for your complexion to burn, freckle, tan including how deeply it tans and general skin sensitivity). Each criterion is evaluated on a scale from 0-4. Understanding your results before your microblading consultation can help you better understand your PMU artist’s thought process, guidance and stimulate a more informed conversation when discussing potential pigment shade options. Complete a self-assessment with the information below:
Credit: GlowDry Australia/Pinterest
Natural Skin Colour (Before Sun Exposure):
- Ivory, Near-Porcelain White = 0
- Fair, Relatively Pale White = 1
- Fair to Beige or Light Olive (Golden Undertones) = 2
- Olive or Light Brown = 3
- Brown to Deep Brown/Black = 4
Natural Hair Colour:
- Red or Light Blonde = 0
- Blonde = 1
- Dark Blonde, Chestnut or Light Brown = 2
- Brown or Dark Brown = 3
- Dark Brown or Black = 4
Natural Eye Colour:
- Light Blue, Light Grey, Light Green = 0
- Blue, Grey, Green = 1
- Hazel or Light Brown = 2
- Brown/Dark Brown = 3
- Deep Brown/Black = 4
Number of Freckles (On Unexposed Skin):
- Considerable = 0
- Several = 1
- A Few = 2
- Very Few = 3
- None = 4
Chances of Sunburn:
- Always Burn = 0
- Often Burn = 1
- Sometimes Burn = 2
- Rarely Burn = 3
- Never Burn = 4
Frequency of Skin Tanning:
- Never (Always Burn) = 0
- Infrequently = 1
- Sometimes = 2
- Often = 3
- Always = 4
Sun Tan Intensity:
- Not At All = 0
- Light Tan = 1
- Moderate Tan = 2
- Deep Tan = 3
- Naturally Dark Skin = 4
Skin Sensitivity To The Sun:
- Very Sensitive = 0
- Sensitive = 1
- Normal = 2
- Resilient = 3
- Highly Resilient/No Sensitivity = 4
Results:
- Skin Type 1: 0-6
- Skin Type 2: 7-13
- Skin Type 3: 14-20
- Skin Type 4: 21-27
- Skin Type 5: 28-34
- Skin Type 6: 35+
Consider Your Skin Undertones
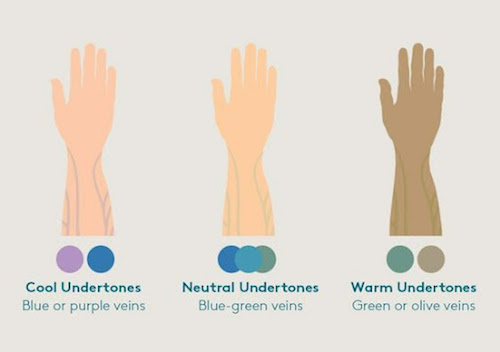
Once you’ve identified which of the 6 skin types best matches your complexion, consider your skin undertones to help inform choosing your ideal microblading pigment shade(s). Understanding colour theory is essential to selecting the perfect microblading eyebrow colour for your skin tone and achieving your desired results. Determine whether you have warm, cool or neutral undertones using the vein or jewelry test. When checking the veins on your wrist: Know that blue veins = suggest pink or cool skin undertones and green veins = indicate yellow or warm skin undertones. If your veins have a bluish-green hue, you likely have a neutral skin tone.
Select microblading pigment shades with opposite undertones from your natural complexion, so the red and green/bluish undertones balance each other out when applied to the skin. If you have neutral skin undertones, you have more leniency when choosing a microblading brow colour – depending on your desired final look. When selecting the right pigment shade with neutral undertones, your focus will be mostly on how deep of a shade – taupe, light, medium or dark brown eyebrow colour – will be most flattering.
Your PMU artist will evaluate your skin tone to create a custom pigment colour to suit your individual needs and use a modifying shade if necessary to cancel out any prominent yellow or pink undertones that could negatively impact how the pigment settles and heals into the skin. No one goes into a microblading appointment wanting to end up with blue or red eyebrows. Pigments with slightly golden undertones work well to cancel out bluish undertones and are flattering for redheads who want to minimize the red in their eyebrows.
Understand Colour Theory For Microblading
Clients with cool skin undertones have rosy complexions and often have light skin tones – ranging from porcelain to pale or light fair complexions. These individuals should choose microblading pigment shades that have cool, ashy or yellow undertones (Skin Type 1). Clients with fair complexions or sparser brows (Skin Type 2) should opt for more yellow, golden or olive-based pigments (warm-neutral tones) over orange or red-based (very warm) shades. Light redheads or individuals with natural strawberry blonde hair should select an eyebrow pigment colour with a more neutral tone like a taupe or dark blonde (with a golden undertone). Microblading pigment colours with prominent red undertones can create an unflattering stark contrast on extremely pale skin or thinner brows.
Individuals with neutral undertones tend to have golden or peach tones in their skin or hair. Most clients of European or Asian descent fall into this category (Skin Type 3). When selecting the perfect microblading pigment, clients with neutral undertones will typically find most brown or ash tones flattering on their complexion. However, if a client has slightly more peachy skin undertones (often they will have peachy tones and more freckles extending onto the chest), be cautious about using any pigment shade with warmer undertones. Individuals with neutral peach undertones might want to select a slightly more cool-toned, ashy pigment colour to ensure they don’t end up with orange or red eyebrows at the end of the healing process.
Credit: Colorescience/Pinterest
Clients with warmer undertones often have olive, honey or light to deep brown or black complexions. Most individuals with medium to dark skin tones (Skin Types 4, 5 and 6) will fall into this category. Those with dark brown hair and who tan easily will likely want to opt for a microblading pigment shade with warm undertones. Redheads with darker hair also fall into this should select auburn or slightly more warmed-toned brown shades to complement their fiery mane and fair complexion.
However, it’s important to remember that most pigments heal slightly darker and ashier on the skin than they appear in the bottle - regardless of their more prominent undertones.
Decide To Go Bold or Natural
Another way to determine whether you should select a warm, neutral or cool-toned microblading pigment shade is by the desired fullness of your final brow results. Microblading brow colours with warmer undertones can provide a bolder look and are best suited for individuals who want more prominent, full-looking brows. If you’re seeking a brow refresh and a more natural look, your PMU artist may select a neutral (yellow-based) or slightly cool-toned pigment shade. Because these colours with neutral or cool undertones show up as a blonde or light brown on the skin, they work best as a filler shade when you’re seeking a subtle brow pick-me-up – regardless of your skin type and undertones.
Microblading Quick Facts:
- Microblading Session Cost: Around $500-$2,000, depending on your location, artist and studio choice (typically includes both the primary and follow-up sessions)
- How Long Microblading Treatments Last: 18-30 Months (around 1-3 years, depending on your skin type, how well you maintain them and general lifestyle habits)
- Length of Microblading Appointment: Approximately 2-3 hours for the entire appointment (including the consultation); 60 minutes for the procedure itself – the follow-up session should take an hour or less
- How Long Microblading Takes To Heal: 30-45 days (wait 6-8 weeks to schedule a follow-up/touch-up session)
Does Microblading Hurt?:
Microblading can be painful, but most technicians use a numbing cream, like Zensa Numbing Cream, to keep the pain to a minimum. When a numbing cream is applied as directed (15-25 minutes before the procedure), you should feel relatively little to no pain. Most likely, you will hear and feel a slight scratching sensation as the needles puncture your skin.
How To Use Zensa Numbing Cream For Microblading:
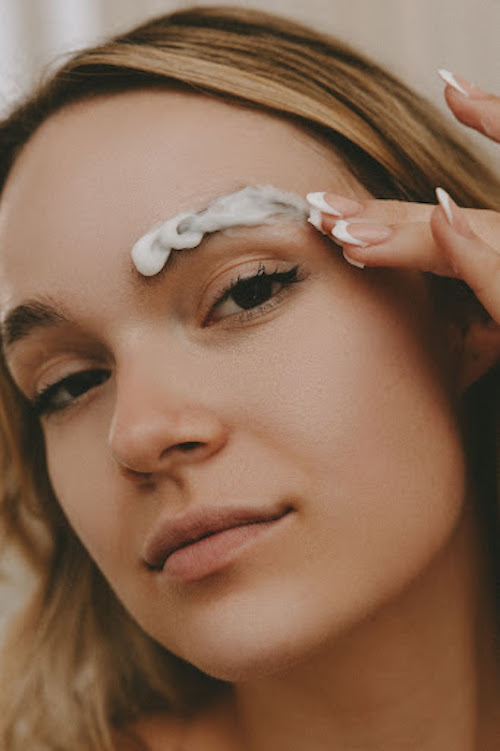
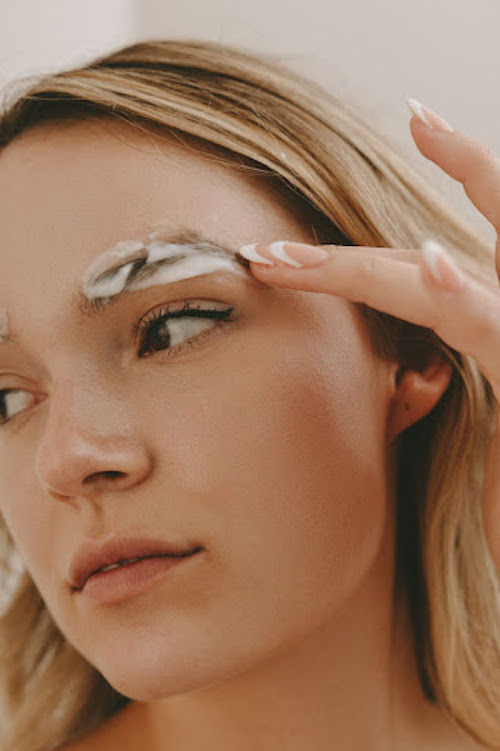
- Exfoliate & Apply: After brow mapping, exfoliate the brows with a fresh spoolie. Next, use a sterile applicator to apply a half-inch thick layer of Zensa Numbing Cream to the area. Do not rub it into the skin.
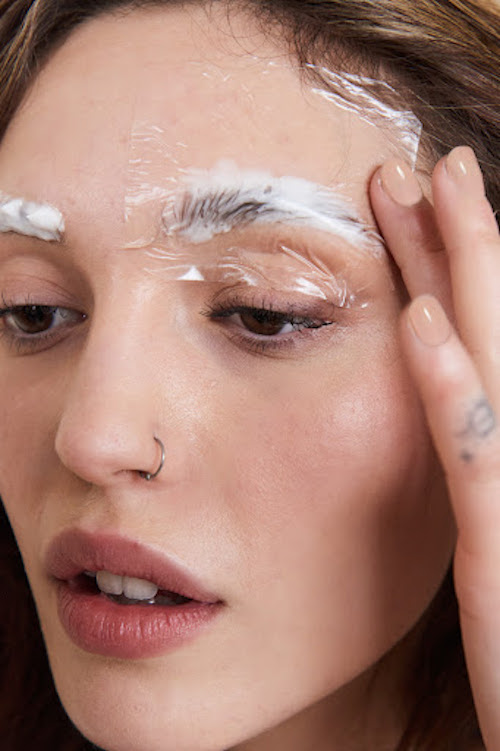
- Seal: Cover the area with cling wrap (such as Press n’ Seal) to maximize the numbing cream’s absorption. Leave the numbing cream on for 15-25 minutes to allow the lidocaine to activate before beginning the procedure.
- Remove: Take off the cling wrap. Gently dab away (don’t wipe) the excess numbing cream using a sterile gauze or a q-tip (dab it off one brow at a time). Begin the microblading procedure. It is safe to reapply additional Zensa Numbing Cream onto the area after the first pass if needed.
Microblading After-Care Instructions:
Around 2 hours after your initial microblading appointment, take a fresh cotton swab and gently wash the area with sterilized water. Excess ink, blood or ooze will probably come off during this cleaning to ensure that the brows remain bacteria-free. Your freshly tattooed brows are most prone to infection during the first week, so it is crucial to follow recommended hygiene practices consistently during this period.
Apply mild antibacterial soap to the area in the morning and at night with room temperature water using a cotton pad or ball. After cleansing, gently pat the area dry with a fresh paper towel or cloth. Always make sure to wash your hands thoroughly before touching your newly-inked brows to prevent potential infection.
Once completely dry, follow up your washing routine and hydrate your brows with an after-care balm. Apply a thin layer of a moisturizing product, like Zensa Healing Cream, to the area up to three times a day. Follow these instructions for at least the first two weeks or as long as recommended by your PMU artist.
Microblading Healing Process Overview
Microblading healing process takes around 30-45 days before your brows fully heal. Your brows are the most vulnerable during the first 7-10 days after microblading:
- First 72 Hours: Expect some minor redness, bruising swelling, oozing and bleeding. You might notice your brows darkening during these first 3 days. Don’t be alarmed that your intended brow colour is ruined. This colour change is a normal part of the healing process and indicates that scabs are forming on the skin below your brows.
- Days 5-10 After Microblading: Scabs will start to flake and fall off (never pick or touch these scabs). You might experience some uncomfortable itchiness during this stage of the microblading healing process.
- After 14 Days of Microblading After-Care: Your brows should be mostly healed. However, you will still need to avoid certain habits, including scheduling chemical peels, laser treatments or reincorporating your retinol or glycolic acid-containing skincare products back into your routine. You should wait until after your follow-up appointment to resume using these treatments or products.
Schedule a follow-up appointment 6-8 weeks after your initial microblading session. During this next appointment, your artist can touch up any patchy areas to refine your final brow colour and shape.
To learn more, read everything you should know about the microblading healing process HERE.
