18 Tips For A More Painless Ear-Piercing Experience
18 Tips For A More Painless Ear-Piercing Experience
While exciting, a new piercing needs more T.L.C. than your typical eye (or rather, ear) candy. Like any procedure done with a needle, ear piercings involve varying degrees of discomfort or pain – depending on the placement you choose and how well you care for your skin before, during and after your ear piercing session. Different types of ear piercings will be more painful by default, so choose wisely and know that proper preparation and after-care can only ease this inevitable discomfort. See our ranking of the least to most painful ear piercings (on the pain scale from 1- 10) to help you through this initial decision process. Once you decide on the piercings you can withstand given your personal pain tolerance, it’s time to focus on making the experience as painless as possible – both while in the studio chair and during the healing process.
Expert Tip: Zensa Numbing Cream offers 5% lidocaine for maximum strength pain prevention and does not contain any vasoconstrictors, which briefly thin your skin texture and increase swelling at the piercing site. Our unique formula is ideal for piercings (watch a pain-free piercing experience shown in action here) because of its natural pH (designed for sensitive areas) and vitamin E concentration. Vitamin E offers anti-inflammatory benefits to soothe the inevitable swelling that occurs as a side effect of getting an ear piercing.
Read on to learn about ways to minimize ear piercing pain with our best tips on: How to prepare for an ear piercing; Ear piercing pain and healing times for different placements, and; The best after-care instructions to prevent an infected ear piercing (with some suggested home remedies or treatment options for any painful side effects).

Do Extensive Research On Local Piercing Studios
Finding the right expert and piercing studio will make all of the difference throughout your entire piercing experience. A top-rated piercer will ensure your piercing is done correctly and can provide you with the necessary education on how to prepare for your piercing and answer any questions you have on the healing process or piercing after-care instructions. Having access to these resources can put your mind at ease and prevent an infected ear piercing – which will help minimize pain during and after getting your ear piercing.
Consideration for potential piercing studios may be based on a recommendation from a friend, family member, or coworker. However, you can always search on Yelp, Google Reviews and social media to find reputable piercers in your area. Browse through an expert’s work on Instagram or their website, and call or email the piercing studio ahead of time to evaluate whether it is the right fit. Consider how the piercing studio discusses its health & safety practices, the staff personalities and whether their rates are in your price range. Feeling comfortable in your environment is essential to have a pleasant ear-piercing experience.
Choose Your Placement(s) Wisely
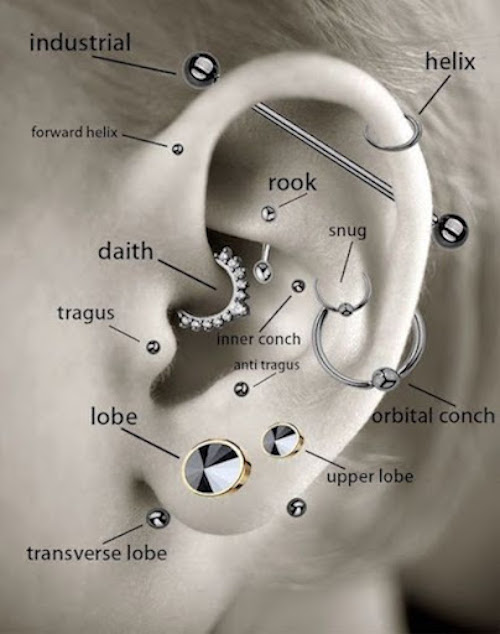
Consider the following when selecting your next ear piercing: your ear anatomy, personal pain tolerance and piercing history. Different types of ear piercings have pros and cons, depending on your desired look and patience during the healing process. For a first-timer, consider a standard lobe piercing – the least painful ear piercing with the shortest healing time compared to other popular placements. However, many individuals have had this ear piercing since childhood and often seek out stacked lobe or cartilage piercings to elevate their ear party. There are several types of cartilage piercings to choose from, which range on the pain scale from a 3-4/10 (e.g. helix piercings) to a 9-10/10 (e.g. an industrial or a snug piercing). Cartilage piercings all take around 6-12 months to heal and require more diligent after-care to prevent infection.
For more information to help your select the best placement(s), read our blog posts: 12 Top Ear Piercing Types & Your Guide To Each One, The Least To Most Painful Types of Ear Piercings, Ranked and Your Guide To Cartilage Ear Piercings: 10 Types To Know.
Credit: Fresh Trends/Pinterest
Try DIY Exposure Therapy
Pinching makes perfect when preparing your skin for an ear piercing. Once you decide on your desired placement, pinch the area where you will be getting your ear piercing to become accustomed to the light pain and pressure you might experience during the procedure. Pinching this skin with your nails once or twice before your piercing session allows you to evaluate whether the procedure with a needle might exceed your personal pain threshold. If this is the case, consider selecting an alternative, less painful piercing option or using a topical anaesthetic like Zensa Numbing Cream (more on this topic later). Always wash your hands before touching your ear – even before getting your piercing – to avoid any skin irritation or infection.
Do A Health Check
See how your body feels in the few days leading up to your piercing appointment. Never commit or follow through with a piercing session when you’re feeling under the weather. Always cancel your piercing session if you have any cold and flu symptoms or feel generally unwell – even if it’s last minute (your body, other clients and your piercer will thank you). Your immunity drops when you’re sick, which runs your body down, delays the wound-healing process and can prolong the piercing’s healing process. Whether you’re feeling sick during the week or the day of your appointment, it is best to give your body at least 2-3 weeks to recover before rescheduling your ear piercing appointment. Eat and sleep well, drink plenty of water and take zinc supplements in the meantime to strengthen your immune system, nourish your body, rest and recover.
Stay Hydrated
Drink plenty of water in the 24-48 hours before your ear piercing session. Keeping your body well-hydrated is essential for supple skin. Being dehydrated thins your skin texture, which can lead to cracked or bleeding skin while getting your ears pierced or during the healing process. Dehydrated skin is also associated with a weaker skin barrier, leaving your skin more vulnerable to infection – especially when getting a piercing. If you get bored of plain water, try adding some lemon, lime, orange slices or berries to your glass of H2O. Herbal tea can also help boost your body’s hydration levels and contains antioxidants with anti-inflammatory properties that can only benefit your skin.
Avoid Alcohol & Caffeine
Let’s begin with this obvious statement: Clients should never show up for an ear piercing while intoxicated. However, it is best to completely avoid alcohol and caffeine for at least 24 hours before getting an ear piercing. These substances are dehydrating and act as blood thinners, which can lead to bruising, cracked skin and a generally more painful ear-piercing experience.
Get A Full Night’s Rest
Make sure to get a full 7-8 hours of sleep on the night before your ear piercing appointment. Lack of sleep has been found to decrease your pain tolerance and can lead to intensified pain the following day. Being well-rested during your piercing session also helps boost immune function and supports the healing process. Too little sleep can delay your piercing’s healing time, leaving it more prone to prolonged swelling, soreness and infection.

Find Ways To Reduce Stress
It is normal to feel some anxiety before getting a new ear piercing – especially if you’re getting your first (lobe or cartilage) piercing. Feeling stressed causes our muscles to tense up and increases our pain perception. Over time, stress can also lead to higher levels of inflammation in the body, which can cause increased swelling and delayed wound healing. Focus on incorporating anxiety-relieving activities into your daily routine, starting at least 1-2 weeks before getting your ear piercing. Try breathing exercises, journaling, meditation, yoga, listening to relaxing music or going for a long walk to destress and ease muscle tension. Going into your ear piercing appointment relaxed will make the experience more pleasant (and can only help to reduce the side effects).
Prep With A Hearty Meal
Always eat a full meal around 3-4 hours before your ear piercing appointment. If you don’t have time to prepare a proper meal, have a nutritious snack 1-2 hours before getting an ear piercing. It is important to stabilize your blood sugar before getting a piercing. Having your blood sugar drop during your ear piercing session can thin the blood and cause excess bleeding during the procedure. Getting an ear piercing while battling low blood sugar increases your chances of feeling dizzy or fainting. Fluctuating blood sugar can also decrease your pain tolerance. Don’t fast in the days leading up to getting an ear piercing. Ensure you have regular meals the day before and the day of your piercing session.
Wear Comfortable Clothing
It’s easier to feel relaxed and less stressed while wearing a comfortable outfit. Tightly-fitting clothes can cause body aches and increase your chances of feeling faint – the last thing you want while getting an ear piercing. If possible, forgo the tight jeans or stiff professional attire before heading to your appointment. It is ideal to wear loose-fitting, comfortable clothing (like sweatpants, relaxed-fit jeans and tee shirts, flowy dresses, etc.) to get your ear piercing.
Numb The Area Before Piercing
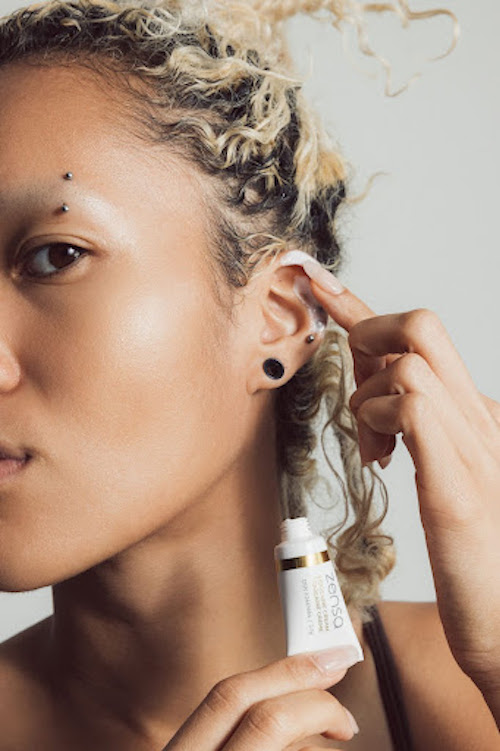
Consider using a numbing agent before getting an ear piercing. It is common to use ice on the ears for 15-30 minutes before getting your piercing. Icing the ears can potentially numb the pain receptors in the area and confuse the brain as to where the pain is coming from. Never use NSAIDs (Non-steroidal anti-inflammatory drugs), like ibuprofen and aspirin, before getting a piercing. These medications can thin your blood and increase the risks of excess bleeding during or immediately after the procedure. For a more guaranteed method of pain relief, use a topical anaesthetic like Zensa Numbing Cream. Zensa Numbing Cream contains 5% lidocaine for maximum pain prevention and does not contain vasoconstrictors, which briefly thin your skin texture and increase swelling at the piercing site. Our unique formula also contains vitamin E to offer anti-inflammatory benefits that soothe any inevitable swelling that results from getting an ear piercing.
How to Use Zensa Numbing Cream for Piercings: Apply a thick layer of the numbing cream to the piercing site. If piercing the ears, apply the cream to both sides of the ear. Leave it on for around 10-15 minutes. You should begin feeling the numbing sensation around 5 minutes after the product’s application.
Follow Your Piercer’s After-Care Instructions Carefully
Proper ear piercing after-care is essential to prevent an infected piercing (or other side effects, such as painful swelling, redness, soreness, itchiness or delayed healing). Follow your piercer’s after-care instructions to a T. Listen carefully to see if your piercer has any specific recommendations for the type of ear piercing you chose. Take notes or set reminders on your phone if necessary.
Both lobe and cartilage piercings should be cleaned 2-3 times daily with a saline solution, fragrance-free soap or another product recommended by your piercer. Dry with a clean paper towel. Always wash your hands with soap and water before touching or cleaning your piercing. For more information on how to take care of a new ear piercing, check out our blog post on ear piercing healing times and after-care instructions for different types of ear piercings.
Use Home Remedies For Ear Piercing Pain
It is normal for ear piercing pain to last for up to a few days after your appointment. Some common side effects include inflammation or red, swollen skin, soreness and itchiness around the fresh piercing. Remember not to sleep on your new ear piercings. This can increase or prolong tenderness around the piercing site. For some natural relief, consider trying these effective home remedies for ear-piercing pain:
-
Chamomile Tea Bag Compress
-
Ice/Cold Compress
-
Sea Salt Solution (mix sea salt with warm water)
-
Tea Tree Oil
-
Almond Oil
-
Jojoba Oil
-
Coconut Oil
-
Turmeric (combined with coconut oil for enhanced wound-healing benefits)
-
Calendula Oil
-
Shea Butter
Zensa Healing Cream contains medicinal-grade calendula oil with ingredients like shea butter to nourish the skin and relieve ear-piercing pain. Calendula oil offers anti-inflammatory, antibacterial, antiseptic, antiviral and collagen-boosting benefits to reduce inflammation, hydrate and soothe the skin, calm redness, ward off microbes and promote new tissue growth to support the wound healing process.

Use A Cold Compress
Placing a clean ice pack or a cold compress on a new piercing is a simple way to help relieve ear-piercing pain and reduce swelling. Use ice on the fresh piercing for no more than 15-20 minutes at a time for the first few days after getting your new ear piercing. If your ear piercing gets infected, you will probably want to ice the infected ear piercing multiple times a day until the symptoms significantly diminish or go away.
Consider Pain Relief Medications
While you should never use them before a piercing, it is perfectly acceptable to use NSAIDs after the piercing is complete – especially if natural remedies are not doing enough to soothe the pain. Products like ibuprofen (Advil, Motrin) have anti-inflammatory properties to help reduce swelling and accompanying pain. Read the instructions carefully to ensure you’re taking the correct dosage and are not at risk of any complications.
Keep Your Piercing Dry, Clean & Germ-Free
Avoid any products, materials or activities that can create a breeding ground for bacteria and potential infection. Do not take a bath or go swimming in a pool, lake, ocean or any other public bodies of water for at least a week after getting an ear piercing. Always pat the area dry with a fresh paper towel after showering or cleaning your piercing. Change your linens, and use fresh towels right after getting your ear piercing (although you should not be sleeping directly on your new piercing). Only use products approved by your piercer on the healing skin. Be careful to remove any shampoo, conditioner or soap residue immediately after showering. Do not touch or fiddle with your piercing unless you’re cleaning it.

Maintain Healthy Lifestyle Habits
Following a healthy diet, drinking plenty of water and consistently getting 7-8 hours of sleep nightly helps to support your immunity and the wound-healing process. Avoid spicy, salty or highly processed foods and hot beverages for the next few days after getting an ear piercing. Consuming cold food and drinks can help reduce swelling. Taking vitamin B and zinc supplements can accelerate the healing process alongside your scheduled cleaning routine. Consider incorporating leafy greens (spinach, kale, etc.), legumes, seeds, avocado and mushrooms into your diet to support your ear piercing’s healing journey.
Treat Infected Ear Piercings Immediately
If mild side effects from your ear piercing, like minor soreness, redness or swelling, don’t go away in a few days, consider whether you might have an infected ear piercing. The most common signs of an ear piercing infection are:
-
Moderate to Severe Swelling
-
Hot or Warm Sensation At The Piercing Site
-
Redness
-
Itchiness or Irritation
-
Oozing Blood or White, Yellow or Green Pus
-
Crusty Discharge
-
Earring Gets Stuck In Your Ear
-
Fever or Generally Feeling Unwell
While painful and unsightly, don’t get too concerned as most ear piercing infections are relatively mild and can be treated at home with a low-maintenance routine that incorporates OTC treatments, everyday products (like ice and sea salt solution) and natural skincare ingredients, like Zensa Healing Cream.
